Introduction to Spooky Spiderweb Pancakes
As the leaves turn and the air gets crisp, I can’t help but get excited about Halloween. What better way to kick off the spooky season than with a breakfast that’s both fun and delicious? Enter my Spooky Spiderweb Pancakes! These fluffy pancakes drizzled with chocolate syrup are not just a treat for the taste buds; they’re a feast for the eyes too. Perfect for busy mornings or a special Halloween brunch, this recipe is sure to impress your loved ones. Plus, it’s a fantastic way to get the kids involved in the kitchen!
Why You’ll Love This Spooky Spiderweb Pancakes
These Spooky Spiderweb Pancakes are a delightful blend of ease and creativity. They come together in just 25 minutes, making them perfect for busy mornings or festive gatherings. The fluffy texture paired with rich chocolate syrup creates a taste that’s simply irresistible. Plus, the fun spiderweb design adds a playful touch that will make everyone smile. It’s a breakfast that turns ordinary mornings into extraordinary memories!
Ingredients for Spooky Spiderweb Pancakes
Gathering the right ingredients is the first step to creating your Spooky Spiderweb Pancakes. Here’s what you’ll need:
- Pancake batter: You can use a homemade recipe or a store-bought mix. Homemade batter often yields fluffier pancakes, but a mix saves time.
- Chocolate syrup: This is the star of the show! It creates the spiderweb design and adds a sweet touch. Feel free to adjust the amount based on your chocolate cravings.
- Whipped cream: A dollop of whipped cream in the center mimics a spider’s nest. You can use store-bought or whip your own for a fresher taste.
- Plastic or candy spider: This is optional but adds a fun, spooky element to your pancakes. It’s a great way to get the kids excited!
- Butter: A little butter is essential for cooking the pancakes. It adds flavor and helps achieve that golden-brown color.
- Maple syrup: For those who love a drizzle of sweetness, maple syrup is a classic choice. It pairs beautifully with the chocolate.
- Powdered sugar: An optional dusting of powdered sugar can elevate the presentation, making your pancakes look even more festive.
For exact measurements, check the bottom of the article where you can find everything you need for printing. Now, let’s get cooking!
How to Make Spooky Spiderweb Pancakes
Now that we have our ingredients ready, let’s dive into the fun part: making these Spooky Spiderweb Pancakes! Follow these simple steps, and you’ll have a breakfast that’s both delicious and delightfully spooky.
Step 1: Prepare the Skillet
Start by heating a skillet over medium heat. Add a small pat of butter and let it melt. This will create a non-stick surface and give your pancakes that lovely golden color. Make sure the skillet is hot enough; a drop of water should sizzle when it hits the surface. If it doesn’t, wait a bit longer!
Step 2: Cook the Pancakes
Pour your pancake batter onto the skillet to form medium-sized pancakes. I usually aim for about 4 inches in diameter. Cook them until bubbles form on the surface, then flip them over. They should be golden brown on both sides. This process takes about 2-3 minutes per side. Keep an eye on them; nobody likes burnt pancakes!
Step 3: Create the Spiderweb Design
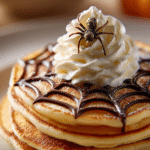
Once your pancakes are cooked, place one on a plate. Here comes the fun part! Drizzle chocolate syrup in a spiral pattern on top. Then, take a toothpick and gently drag lines from the center outward, creating a spiderweb effect. It’s like being an artist in the kitchen! Don’t worry if it’s not perfect; the spookiness is in the charm.
Step 4: Add the Whipped Cream Nest
Next, pipe or spoon a generous dollop of whipped cream right in the center of the pancake. This will act as the “nest” for our spooky spider. It’s a fun touch that adds both flavor and flair. Plus, who doesn’t love whipped cream?
Step 5: Garnish and Serve
Finally, it’s time to garnish! Place a plastic or candy spider on top of the whipped cream nest. This little detail makes all the difference and adds to the Halloween spirit. Serve your Spooky Spiderweb Pancakes immediately, and don’t forget to offer extra syrup or a dusting of powdered sugar for those who want a little more sweetness!
Tips for Success
- Use a non-stick skillet for easy flipping and cleanup.
- Keep the heat at medium to avoid burning the pancakes.
- Experiment with different toppings like fruit or nuts for added flavor.
- Make a double batch and freeze extras for busy mornings.
- Involve the kids in decorating for a fun family activity!
Equipment Needed
- Skillet: A non-stick skillet works best, but any frying pan will do.
- Spatula: A flat spatula helps flip the pancakes easily.
- Toothpick: This is essential for creating the spiderweb design.
- Mixing bowl: Use this for combining your pancake batter.
- Whisk: A whisk is great for mixing the batter smoothly.
Variations
- Whole Wheat Pancakes: Swap regular flour for whole wheat flour for a healthier twist. It adds a nutty flavor and extra fiber.
- Gluten-Free Option: Use a gluten-free pancake mix to accommodate dietary restrictions. You won’t lose any of the fun!
- Chocolate Chip Pancakes: Add chocolate chips to the batter for an extra chocolatey treat. Who can resist more chocolate?
- Fruit Toppings: Top your pancakes with fresh berries or sliced bananas for a fruity flair. It adds color and nutrition!
- Vegan Version: Substitute eggs with flaxseed meal and use plant-based milk for a vegan-friendly pancake. They’ll still be fluffy and delicious!
Serving Suggestions
- Fresh Fruit: Serve with a side of sliced strawberries or bananas for a refreshing contrast.
- Hot Chocolate: Pair with a warm cup of hot chocolate for a cozy, festive drink.
- Presentation: Use colorful plates or Halloween-themed decorations to enhance the spooky vibe.
- Extra Toppings: Offer a variety of toppings like nuts, sprinkles, or flavored syrups for customization.
FAQs about Spooky Spiderweb Pancakes
Can I make Spooky Spiderweb Pancakes ahead of time?
Absolutely! You can prepare the pancakes in advance and store them in the fridge. Just reheat them in a skillet or microwave when you’re ready to serve. This makes for a quick breakfast on busy mornings!
What can I use instead of chocolate syrup?
If chocolate syrup isn’t your thing, you can use caramel sauce or even fruit syrup. Maple syrup also works well for a sweeter touch. Get creative with your toppings!
How can I make these pancakes healthier?
To make your Spooky Spiderweb Pancakes healthier, consider using whole wheat flour or a gluten-free mix. You can also reduce the sugar in the batter and top them with fresh fruit instead of syrup.
Can I freeze the pancakes?
Yes! These pancakes freeze beautifully. Just stack them with parchment paper in between and store them in an airtight container. They’ll be ready for a quick breakfast anytime!
What’s the best way to store leftovers?
Store any leftover pancakes in an airtight container in the fridge for up to three days. Reheat them in the microwave or toaster for a quick and tasty treat!
Final Thoughts
Creating Spooky Spiderweb Pancakes is more than just making breakfast; it’s about crafting memories. The joy on my kids’ faces as they help drizzle chocolate and create their own spiderwebs is priceless. This recipe transforms an ordinary morning into a festive celebration, bringing laughter and creativity to the table. Plus, the delicious taste of fluffy pancakes topped with whipped cream and chocolate syrup is simply irresistible. So, gather your loved ones, roll up your sleeves, and dive into this fun culinary adventure. Trust me, these pancakes will become a cherished Halloween tradition in your home!
Print
Spooky Spiderweb Pancakes: A Fun Halloween Breakfast!
- Total Time: 25 minutes
- Yield: 4 pancakes
- Diet: Vegetarian
Description
Fluffy pancakes drizzled with chocolate spiderwebs and topped with whipped cream for a frightfully fun breakfast.
Ingredients
- Pancake batter (homemade or mix)
- Chocolate syrup
- Whipped cream
- Plastic or candy spider (for garnish, optional)
- Butter (for cooking)
- Maple syrup (optional)
- Powdered sugar (optional dusting)
Instructions
- Heat a skillet over medium and melt a little butter.
- Pour pancake batter to form medium-sized pancakes; cook until golden on both sides.
- Place pancake on a plate and drizzle chocolate syrup in a spiral pattern.
- Use a toothpick to drag lines from the center outward, creating a spiderweb effect.
- Pipe or spoon whipped cream into the center as the “nest.”
- Garnish with a candy or plastic spider for a spooky finish.
- Serve immediately with extra syrup or powdered sugar.
Notes
- For a richer flavor, use homemade pancake batter.
- Adjust the amount of chocolate syrup based on your preference.
- Ensure the skillet is at the right temperature to avoid burning the pancakes.
- Prep Time: 10 minutes
- Cook Time: 15 minutes
- Category: Breakfast
- Method: Skillet
- Cuisine: American
Nutrition
- Serving Size: 1 pancake
- Calories: 250
- Sugar: 15g
- Sodium: 300mg
- Fat: 10g
- Saturated Fat: 5g
- Unsaturated Fat: 3g
- Trans Fat: 0g
- Carbohydrates: 35g
- Fiber: 1g
- Protein: 5g
- Cholesterol: 30mg


