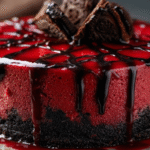
Introduction to Blood Velvet Cheesecake with Oreo Crust
Welcome, fellow food lovers! If you’re looking for a show-stopping dessert that’s as delicious as it is spooky, you’ve come to the right place. This Blood Velvet Cheesecake with Oreo Crust is not just a treat for the taste buds; it’s a feast for the eyes too! Perfect for Halloween gatherings or any festive occasion, this cheesecake combines rich flavors with a hauntingly beautiful appearance. Plus, it’s surprisingly easy to whip up, making it a fantastic choice for busy days when you want to impress your loved ones without spending hours in the kitchen.
Why You’ll Love This Blood Velvet Cheesecake with Oreo Crust
This Blood Velvet Cheesecake with Oreo Crust is a delightful blend of flavors and textures that will leave everyone craving more. It’s incredibly easy to make, even for novice bakers, and the vibrant red color adds a fun twist to any dessert table. Plus, the creamy filling paired with the crunchy Oreo crust creates a heavenly bite. Trust me, this cheesecake will be the star of your next gathering!
Ingredients for Blood Velvet Cheesecake with Oreo Crust
Gathering the right ingredients is the first step to creating this spooky delight. Here’s what you’ll need for your Blood Velvet Cheesecake with Oreo Crust:
- Oreo cookies: These provide a rich, chocolatey base for the crust. You can use any chocolate sandwich cookies if you’re in a pinch.
- Unsalted butter: Melted butter helps bind the crushed Oreos together, creating a deliciously firm crust.
- Cream cheese: The star of the show! Softened cream cheese gives the cheesecake its creamy texture. Make sure it’s at room temperature for easy mixing.
- Granulated sugar: This sweetens the filling, balancing the rich flavors of the cream cheese and cocoa.
- Sour cream: Adds a tangy flavor and creaminess to the cheesecake, making it extra luscious.
- Large eggs: Eggs help bind the ingredients together and provide structure to the cheesecake.
- Cocoa powder: This adds a hint of chocolate flavor, enhancing the overall taste of the cheesecake.
- Red gel food coloring: This is what gives the cheesecake its signature blood-red hue. Feel free to adjust the amount for a deeper color.
- Vanilla extract: A splash of vanilla enhances the flavors, making the cheesecake even more delightful.
- Chocolate syrup: For the finishing touch, drizzle chocolate syrup in a spiderweb pattern for that spooky effect.
For exact measurements, check the bottom of the article where you can find everything listed for easy printing. Happy baking!
How to Make Blood Velvet Cheesecake with Oreo Crust
Now that you have all your ingredients ready, let’s dive into the fun part—making this Blood Velvet Cheesecake with Oreo Crust! Follow these simple steps, and you’ll have a show-stopping dessert that’s sure to impress.
Step 1: Preheat the Oven
First things first, preheat your oven to 325°F (160°C). This ensures that your cheesecake bakes evenly, giving it that perfect creamy texture. While the oven warms up, you can get started on the crust!
Step 2: Prepare the Oreo Crust
In a mixing bowl, combine the crushed Oreo cookies with the melted butter. Stir until the mixture resembles wet sand. Then, press this mixture firmly into the bottom of a springform pan. This will be the base of your Blood Velvet Cheesecake with Oreo Crust, so make sure it’s packed tightly!
Step 3: Make the Cheesecake Filling
In a large bowl, beat the softened cream cheese and granulated sugar together until smooth and creamy. This is where the magic begins! Next, add in the sour cream, cocoa powder, vanilla extract, and red gel food coloring. Mix until everything is well combined and you have a luscious, vibrant filling.
Step 4: Incorporate the Eggs
Now, it’s time to add the eggs. Crack them in one at a time, mixing gently after each addition. This helps maintain that creamy texture we’re aiming for. Be careful not to overmix; we want a smooth filling without too much air.
Step 5: Bake the Cheesecake
Pour the cheesecake filling over your prepared Oreo crust. Smooth the top with a spatula for an even finish. Bake in the preheated oven for 55–65 minutes. The center should be just set but still slightly jiggly. This is key for that perfect cheesecake texture!
Step 6: Cool and Chill
Once baked, turn off the oven and let the cheesecake cool inside with the door cracked. This helps prevent cracks from forming. After about an hour, transfer it to the fridge and chill for at least 4 hours, or overnight if you can wait. Patience is a virtue, especially when it comes to cheesecake!
Step 7: Drizzle the Chocolate Web
Before serving, take your chocolate syrup and drizzle it in a spiderweb pattern on top of the cheesecake. This spooky touch not only looks fantastic but adds a delicious chocolatey flavor. Your Blood Velvet Cheesecake with Oreo Crust is now ready to be devoured!
Tips for Success
- Make sure your cream cheese is softened to room temperature for easy mixing.
- Don’t skip the chilling time; it helps the cheesecake set perfectly.
- For a deeper red color, add more red gel food coloring as desired.
- Use a water bath while baking to prevent cracks in your cheesecake.
- Let the cheesecake cool completely before chilling to avoid condensation.
Equipment Needed
- Springform pan: Essential for easy removal of the cheesecake. A regular cake pan works too, but it may be trickier to serve.
- Mixing bowls: Use medium and large bowls for mixing ingredients. Any size will do, just ensure they’re sturdy.
- Electric mixer: A hand mixer or stand mixer makes beating the cream cheese a breeze. You can use a whisk, but it’ll take longer.
- Spatula: Perfect for smoothing the cheesecake filling and drizzling the chocolate syrup.
- Measuring cups and spoons: Accurate measurements are key for baking success!
Variations
- Gluten-Free Option: Substitute regular Oreo cookies with gluten-free chocolate sandwich cookies to make this dessert suitable for gluten-sensitive guests.
- Vegan Twist: Use vegan cream cheese and a plant-based butter alternative for a dairy-free version. Replace eggs with flaxseed meal mixed with water for binding.
- Flavor Infusion: Add a teaspoon of almond extract for a nutty flavor or a splash of espresso for a mocha twist in the cheesecake filling.
- Fruit Topping: Top the cheesecake with fresh raspberries or strawberries for a fruity contrast to the rich chocolate and red velvet.
- Chocolate Lovers: Mix in chocolate chips or chunks into the cheesecake filling for an extra chocolatey experience.
Serving Suggestions
- Pair your Blood Velvet Cheesecake with a scoop of vanilla ice cream for a delightful contrast.
- Serve with a side of fresh berries to add a pop of color and freshness.
- For drinks, consider a rich coffee or a spooky-themed cocktail to complement the flavors.
- Garnish with whipped cream and chocolate shavings for an elegant presentation.
- Use a decorative platter to showcase the cheesecake at your Halloween party!
FAQs about Blood Velvet Cheesecake with Oreo Crust
Can I make Blood Velvet Cheesecake with Oreo Crust ahead of time?
Absolutely! This cheesecake is perfect for making ahead. Just prepare it a day in advance and let it chill overnight. It’ll be even more delicious the next day!
How do I store leftovers of Blood Velvet Cheesecake with Oreo Crust?
Store any leftovers in an airtight container in the refrigerator. It should stay fresh for up to five days, but I doubt it will last that long!
Can I freeze Blood Velvet Cheesecake with Oreo Crust?
Yes, you can freeze it! Wrap the cheesecake tightly in plastic wrap and then in aluminum foil. It can be frozen for up to three months. Just thaw it in the fridge before serving.
What can I use instead of red gel food coloring?
If you don’t have red gel food coloring, you can use liquid food coloring, but the color may not be as vibrant. Alternatively, beet juice can provide a natural red hue, though it may alter the flavor slightly.
Can I use a different crust for the Blood Velvet Cheesecake?
Of course! While the Oreo crust is delicious, you can use a graham cracker crust or even a chocolate cookie crust for a different twist. Just make sure it’s firm enough to hold the cheesecake filling!
Final Thoughts
Creating this Blood Velvet Cheesecake with Oreo Crust is more than just baking; it’s an experience filled with joy and creativity. The vibrant red hue and rich flavors make it a standout dessert that brings smiles to faces, especially during Halloween. I love how this cheesecake combines the nostalgia of childhood treats with a sophisticated twist. Whether you’re sharing it at a spooky gathering or enjoying a slice on a cozy night in, this cheesecake is sure to create lasting memories. So, roll up your sleeves and dive into this delightful recipe—you won’t regret it!
Print
Blood Velvet Cheesecake with Oreo Crust: A Spooky Delight!
- Total Time: 5 hours 20 minutes
- Yield: 10 slices 1x
- Diet: Vegetarian
Description
A hauntingly rich cheesecake with a deep red velvet filling and spooky chocolate web drizzle.
Ingredients
- 24 Oreo cookies (crushed)
- 4 tbsp unsalted butter (melted)
- 24 oz cream cheese (softened)
- 1 cup granulated sugar
- 1 cup sour cream
- 3 large eggs
- 2 tbsp cocoa powder
- 1 tbsp red gel food coloring
- 1 tsp vanilla extract
- Chocolate syrup (for web drizzle)
Instructions
- Preheat oven to 325°F (160°C).
- Mix crushed Oreos with melted butter and press into a springform pan for the crust.
- Beat cream cheese and sugar until smooth.
- Add sour cream, cocoa powder, vanilla, and red food coloring to the mixture.
- Mix in eggs one at a time until just combined.
- Pour filling over the Oreo crust and smooth the top.
- Bake for 55–65 minutes, until the center is just set.
- Turn off the oven and let the cheesecake cool inside with the door cracked.
- Chill for at least 4 hours or overnight.
- Drizzle chocolate syrup in a spiderweb pattern before serving.
Notes
- Ensure the cream cheese is softened for easy mixing.
- For a more intense color, add more red gel food coloring as desired.
- Let the cheesecake cool completely before chilling to avoid cracks.
- Prep Time: 20 minutes
- Cook Time: 1 hour
- Category: Dessert
- Method: Baking
- Cuisine: American
Nutrition
- Serving Size: 1 slice
- Calories: 350
- Sugar: 25g
- Sodium: 300mg
- Fat: 22g
- Saturated Fat: 12g
- Unsaturated Fat: 8g
- Trans Fat: 0g
- Carbohydrates: 30g
- Fiber: 1g
- Protein: 5g
- Cholesterol: 80mg


